Binder
Contents
Binder
Overview
Now that we have seen how to use and capture the computational environment used in a Python project, it is time to think about how to share that environment.
With an environment.yml file (or similar, from alternative package management systems),others can recreate the environment specified by that file.
However, this relies on the new user having the same package management system set up, and knowing how to use it. It would be far easier if there was an automated solution to recreate the computational environment - and this is where Binder comes in.
Binder uses a tool called repo2docker to create a Docker image of a project based on the configuration files that are included.
The resulting image contains the project and the computational environment specified by the original user.
Other users can access the image via a cloud-based BinderHub, which allows them to view, edit and run the code from their web browser.
Juliette Taka’s excellent cartoon below illustrates the steps in creating and sharing a “binderized” project.
Step 1: We start with a researcher who has completed a project and wants to share her work with anyone, regardless of their computational environment. Note that Binder does not only have to be applied to finished projects; it can be used in the same way to share projects that are in progress.
Step 2: The researcher’s project contains many files of different types. In this case, the researcher has been working in Jupyter notebooks. However, Binder can be used just as effectively with many other file formats and languages which we will cover in more detail shortly.
Step 3: The researcher uploads her code to a publicly available repository hosting service, such as GitHub, where others can access it. She includes a file describing the computational environment required to run the project.
Step 4: She generates a link at the mybinder.org BinderHub.
By clicking on this link, anyone can access a “binderized” version of her project.
The click triggers repo2docker to build a Docker image based on the contents of the repository and its configuration files.
This image is then hosted on the cloud.
The person who clicked the link will be taken to a copy of her project in their web browser where they can interact with it.
This copy of the project is hosted in the environment the researcher specified in step 3, regardless of the computational environment it is accessed from.

Fig. 35 Figure credit - Juliette Taka, Logilab and the OpenDreamKit project
To get an idea of what this looks like, below is a binder of a simple example project. Files are listed and can be clicked on and modified by the person accessing the Binder.
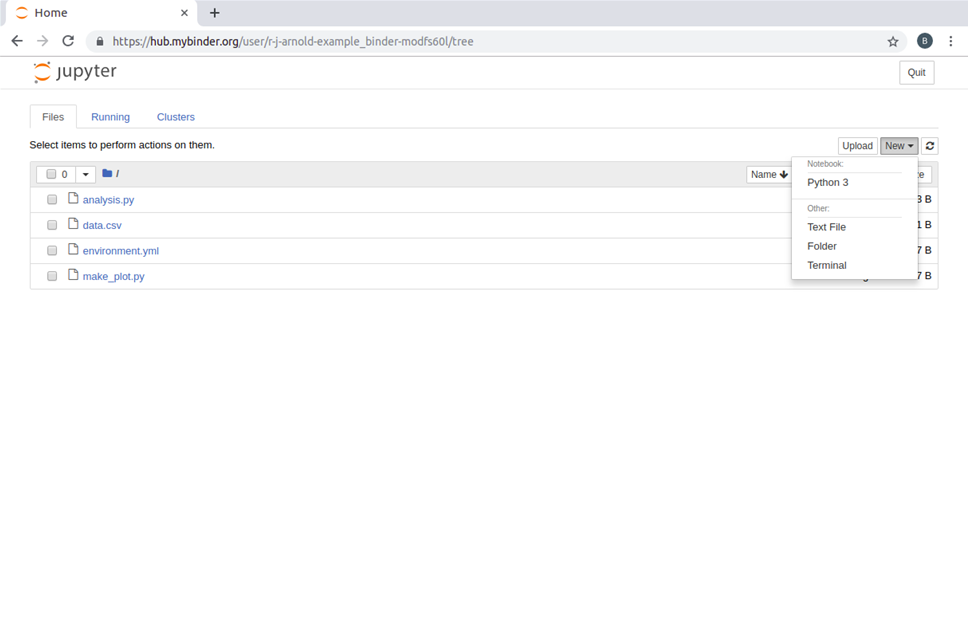
Fig. 36 A binder of a sample project.
Users can also open terminals to run or otherwise interact with the files by clicking on “New” and then “Terminal” in the top right of the home Binder screen shown above. Here, this is used to run the analysis script in the example Binder which performs a linear regression on some data:
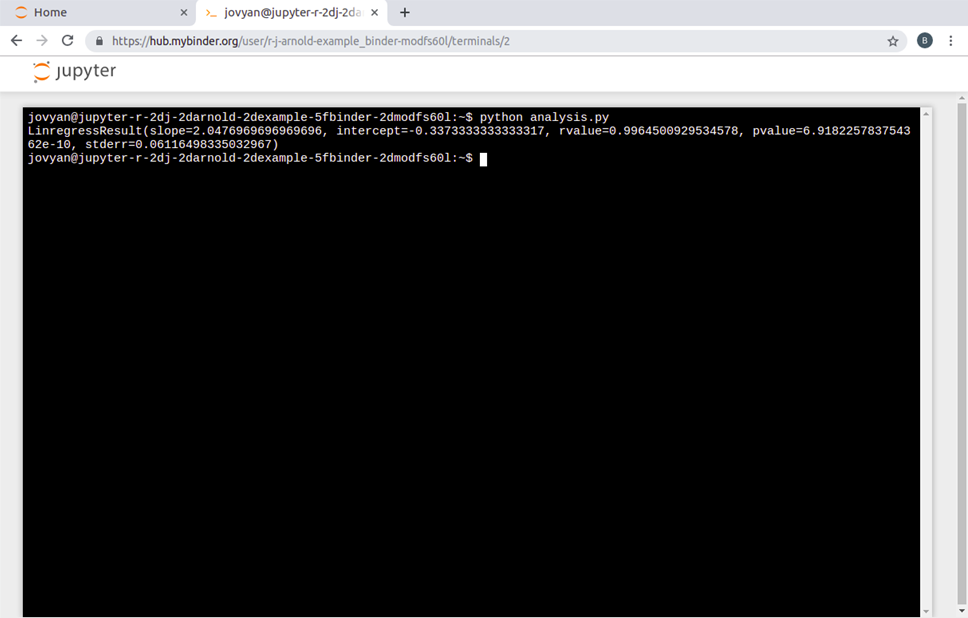
Fig. 37 A screenshot of a terminal where users can run or interact with project files
As mentioned, Binder is well integrated with Jupyter notebooks.
Notebooks can be opened by clicking on “New” and then “Notebook” in the same way terminals can be opened.
These may be more convenient for those working with graphical outputs, as shown here where one is used to run make_plot.py in the example Binder:
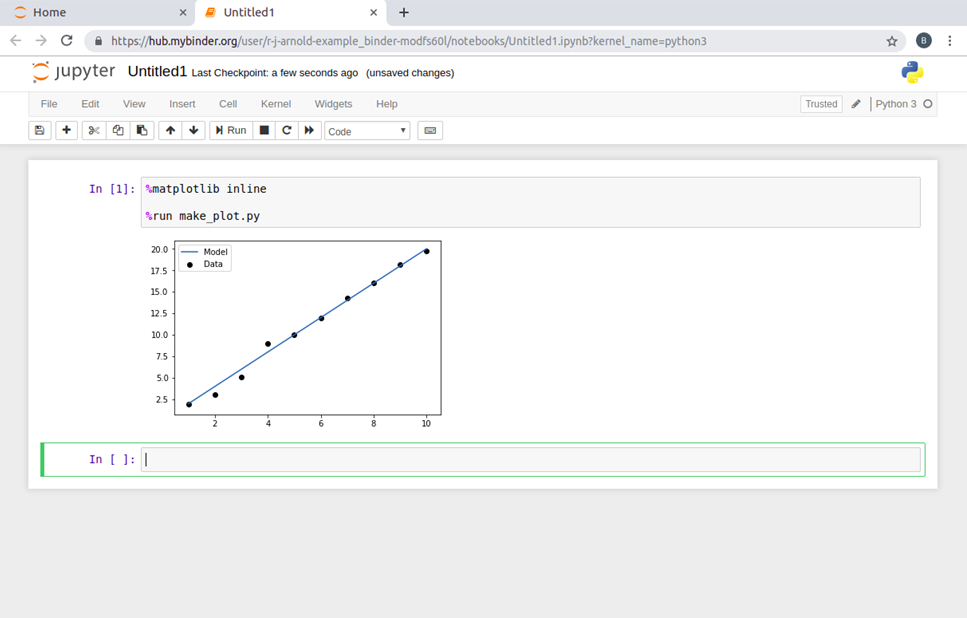
Fig. 38 A screenshot of a Jupyter Notebook integrated with Binder
If R is installed in a Binder, the dropdown menu will show the options to open R Jupyter notebooks and RStudio sessions in the Binder.
Disambiguation
In this section, there are some related terms, which will be outlined here for clarity:
Binder: A sharable version of a project that can be viewed and interacted within a reproducible computational environment via a web browser.
BinderHub: A service which generates Binders. The most widely-used is mybinder.org, which is maintained by the Binder team. It is possible to create other BinderHubs which can support more specialised configurations. One such configuration could include authentication to enable private repositories to be shared amongst close collaborators.
mybinder.org: A public and free BinderHub. Because it is public, you should not use it if your project requires any personal or sensitive information (such as passwords).
Binderize: To make a Binder of a project.
Creating a Binder for a Project
Creating a binderized version of a project involves three key steps which will be explained in this section:
Specify the computational environment
Put the project files somewhere publicly available (we will describe how to do this with GitHub)
Generate a link to a Binder of the project
For a list of sample repositories for use with Binder, see the Sample Binder Repositories page.
Step 1: Specify your Computational Environment
Suppose project contains no file specifying the computational environment. When a Binder is generated, the environment will be the Binder default environment, (containing Python 3.6) which may or may not be suitable for the project. However, if it does contain a configuration file for the environment, then the Binder will be generated with the specified environment. A full list of such files Binder accepts, with examples, can be found here. Key ones are discussed below, some of which are language-specific:
environment.ymlRecall that
environment.ymlfiles were discussed in the Package Management Systems section.
Dockerfile
Dockerfiles will be discussed in the Containers section, so will not be discussed further here.
apt.txtDependencies that would typically be installed via commands such as
sudo apt-get install package_nameshould be listed in anapt.txtfile, and will be automatically installed in the Binder.For example if a project uses Latex the
apt.txtfile should readtexlive-latex-base
to install the base Latex package.
default.nixFor those that use the Package Management Systems Nix a
default.nixfile can be a convenient way to capture their environment.
requirements.txt(Python)For Python users a
requirements.txtfile can be used to list dependent packages.For example to have Binder install
numpythis file would simply need to read:numpyA specific package version can also be specified using an
==. For example, to have Binder install version1.14.5ofnumpythen the file would benumpy==1.14.5
The
requirement.txtfile does not need to be handwritten. Running the commandpip freeze > requirements.txtwill output arequirements.txtfile that fully defines the Python environment.
runtime.txtIt is used to specify a particular version of Python or R for the Binder to use.
To specify which version of R to use, find the date it was captured on MRAN and include it in the
runtime.txtfile asr-<YYYY>-<MM>-<DD>
To specify a version of Python, state the version in the
runtime.txtfile. For example, to use Python 2.7, the file would need to readpython-2.7
install.RorDESCRIPTION(R/RStudio)An
install.Rfile lists the packages to be installed. For example, to install the packagetibblein the Binder:install.packages("tibble")
DESCRIPTION files are more typically used in the R community for dependency management.
Step 2: Put your Code on GitHub
GitHub is discussed at length in the chapter on Version Control, which you should refer to if you wish to understand more about this step. In this chapter, we will give a brief explanation. GitHub is a very widely used platform where you can make “repositories”, and upload code, documentation, or any other files into them. To complete this step:
Make an account on GitHub.
Create a repository for the project you wish to make a Binder of.
Upload your project files (including the file you have created to specify your computational environment) to the repository and save (“commit” in the vocabulary of GitHub) them there.
If you are unable to complete these steps, refer to the chapter on version control for a fuller explanation.
Step 3: Generate a Link to a Binder of your Project
Head to https://mybinder.org.
You will see a form that asks you to specify a repository for mybinder.org to build.
In the first field, paste the URL of the project’s GitHub repository.
It will look something like this: https://github.com/<your-username>/<your-repository>
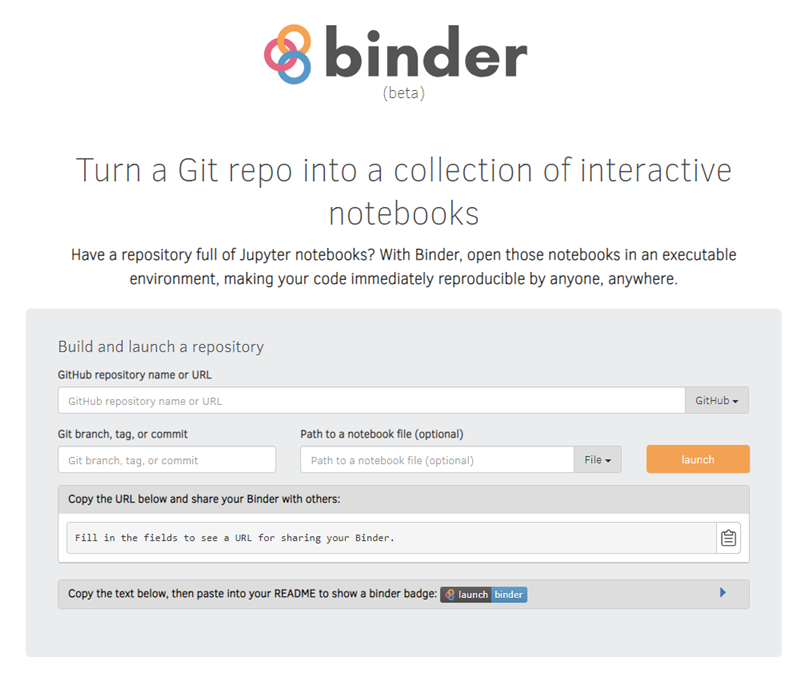
Fig. 39 Interface for generating Binder links for projects
As you can see, there are additional fields in this form, but these are optional and will not be discussed here.
Once the URL to the project to be binderized is supplied, two fields will be automatically populated on the screen depicted above:
The
Copy the URL below and share your Binder with othersfield, provides a link to the Binder that can be copied and shared.The
Copy the text below, then paste into your README to show a binder badgefield, can be included in GitHub to create a button that allows anyone that accesses your project to launch the Binder.
Finally, click the launch button.
This will ask mybinder.org to build the environment needed to run the project.
This may take several minutes.
You can click on the Build logs button to see the logs generated by the build process.
These logs help resolve any issues that cause the build to fail, such as errors in the file defining the computational environment to be generated.
Once it has been built, the Binder will be automatically launched; again, this may take some time.
Including Data in a Binder
There are a few ways to make data available in your Binder. The best one depends on how big your data is and your preferences for sharing data. Note that the more data that is included, the longer it will take for a Binder to launch. Data also takes up storage space that must be paid for, so it is good to be considerate and minimise the data you include, especially on the publicly provided mybinder.org.
Small Public Files
The simplest approach for small data files that are public is to add them directly to your GitHub repository or include them along with the rest of your project files in the Binder. This works well and is reasonable for files with sizes up to 10MB.
Medium Public Files
For medium-sized files - a few 10s of megabytes to a few hundred megabytes - find some other place online to store them and make sure they are publicly available.
Add a file named postBuild (which is a shell script so the first line must be #!/bin/bash) to your project files.
In the postBuild file, add a single line reading:
wget -q -O name_of_your_file link_to_your_file
The postBuild file is used to execute commands when the files to produce the Binder are being generated.
In this case, it can be used to download your data into the files used to launch the binder.
Large Public Files
The best option for large files is to use a library specific to the data format to stream the data as you are using it. There are a few restrictions on outgoing traffic from your Binder that are imposed by the team operating mybinder.org. Currently only connections to HTTP and Git are allowed. This comes up when people want to use FTP sites to fetch data. For security reasons FTP is not allowed on mybinder.org.